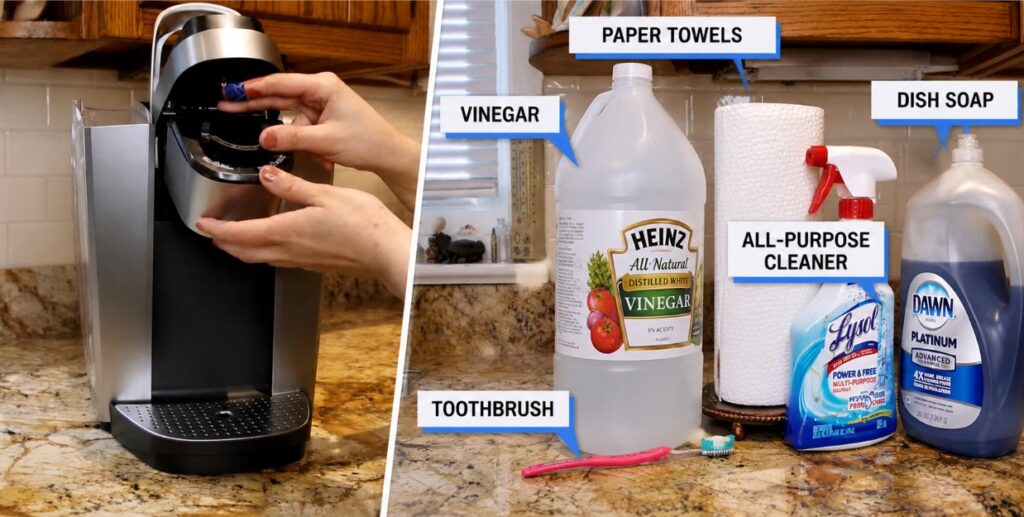
To clean a Keurig coffee maker, wash all removable parts weekly with warm soapy water, descale the internal water lines every 3 to 6 months using white vinegar or Keurig’s descaling solution, and wipe down the exterior and needle assembly regularly to prevent clogs and buildup.
Descaling requires filling the reservoir with descaling solution, running multiple brew cycles without a K-Cup, then flushing the system with fresh water rinse cycles until the solution smell is completely gone.
Skipping regular cleaning causes slow brew times, weak coffee, off-tasting cups, and eventually complete machine failure from mineral scale blocking the internal heating element and water lines.
If your Keurig is brewing slower than it used to, producing weak or bitter coffee, or showing a descale light that won’t turn off, the machine isn’t broken. It’s dirty. Scale buildup, coffee oil residue, and mold growth in the water reservoir are the three most common performance killers in any single-serve coffee maker.
Keurig machines heat water through a small internal heating element and force it through a narrow needle into the K-Cup. That system is efficient but highly sensitive to mineral deposits and organic buildup. Even modest neglect over a few months produces measurable changes in brew temperature, water flow rate, and cup flavor.
This guide covers every cleaning task your Keurig needs, from the daily wipe-down to the full descaling cycle, with specific instructions for the most common models including the Keurig K-Classic, K-Elite, K-Supreme, K-Slim, and K-Duo.
How a Keurig Gets Dirty and Why It Matters
Internal Scale Buildup on the Heating Element
Every cup of water that passes through a Keurig leaves behind trace amounts of dissolved minerals, primarily calcium and magnesium. Over hundreds of brew cycles, these minerals precipitate out of solution and form a hard, chalky deposit called scale directly on the heating element and internal water lines.
Scale acts as an insulator on the heating element, forcing it to work harder and longer to reach the target brewing temperature of 192°F. This increases energy draw, slows brew time, and produces coffee that never quite reaches the optimal extraction temperature.
In severe cases, scale deposits partially or fully block the narrow water tubes inside the machine, causing the machine to produce partial cups, stop mid-brew, or display a persistent descale warning even after a cleaning attempt.
Coffee Oil Residue and Needle Clogging
The entry needle punctures the top of every K-Cup and injects hot water into the pod. The exit needle at the bottom punctures the foil and allows brewed coffee to flow into the cup. Both needles accumulate coffee grounds, oils, and dried residue with every brew.
A partially clogged needle produces uneven water distribution through the K-Cup, which means some grounds are saturated while others are bypassed. The result is an under-extracted, weak cup even when the machine appears to be functioning normally.
Full needle clogs stop water flow entirely and can cause pressure to build inside the K-Cup, leading to blown seals, grounds in the cup, or hot liquid spraying from the pod holder.
Mold and Bacteria in the Water Reservoir
The water reservoir on most Keurig models is a removable, translucent plastic tank. It holds standing water for extended periods, particularly in households that don’t brew daily. Standing water at room temperature is an ideal environment for mold and bacteria growth, especially if mineral deposits or coffee residue are present.
Mold in the reservoir produces visibly dark spots on the tank walls and a musty or earthy smell in the finished coffee. It’s also a genuine hygiene concern since contaminated water passes directly through the brew path into the cup.
Weekly reservoir washing and daily emptying when the machine won’t be used for 24 or more hours prevents mold growth reliably.
Keurig Models and Cleaning Variations
Keurig K-Classic and K-Elite
The Keurig K-Classic (K55) and K-Elite are the most widely owned home Keurig models. Both use a standard removable water reservoir (48 oz on the K-Classic, 75 oz on the K-Elite), a single-piece drip tray, and a two-needle pod holder assembly.
Cleaning these models follows the standard Keurig procedure with no special steps. The pod holder on both models lifts straight out for cleaning without tools. The K-Elite adds a strong brew setting that uses slightly higher water temperature, which increases scale buildup rate slightly compared to the K-Classic at standard settings.
Keurig K-Supreme and K-Supreme Plus
The K-Supreme and K-Supreme Plus use MultiStream technology, which distributes water through five needles across the K-Cup surface rather than a single entry point. This produces better extraction but creates five separate needle channels that require individual cleaning attention instead of one.
The K-Supreme Plus includes a built-in adjustable water reservoir (78 oz) and a programmable descale reminder. Cleaning the multi-needle assembly requires a specialized Keurig needle cleaning tool or a careful pass with a paper clip through each of the five holes individually.
Keurig K-Slim and K-Mini
The K-Slim and K-Mini are compact models with smaller water reservoirs (46 oz and 12 oz respectively) that are designed for light daily use. The K-Mini has a reservoir that holds only a single serving at a time, which actually reduces scale and mold risk compared to larger-tank models since water doesn’t sit for extended periods.
Both models use the same two-needle system as the K-Classic but in a narrower chassis that makes accessing the needle assembly slightly more restricted. The drip tray on the K-Mini is smaller and fills faster during descaling, requiring more frequent emptying during the rinse cycle.
Keurig K-Duo and K-Duo Plus
The K-Duo and K-Duo Plus combine a single-serve K-Cup brewer with a 12-cup carafe drip brewer in one unit. They have two separate brew paths that both require cleaning: the K-Cup side follows standard single-serve Keurig cleaning, while the carafe side has a separate charcoal water filter, a glass or thermal carafe, and a drip basket that all need individual attention.
The K-Duo’s dual-use design means scale builds up in two systems simultaneously. Users who primarily use the carafe side still need to run descaling cycles through the K-Cup path to prevent buildup in the single-serve water lines.
| Model | Reservoir Capacity | Needle Type | Descale Frequency | Special Cleaning Notes |
|---|---|---|---|---|
| K-Classic / K55 | 48 oz | Single entry needle | Every 3 to 6 months | Standard procedure |
| K-Elite | 75 oz | Single entry needle | Every 3 to 4 months | High-temp setting increases scale |
| K-Supreme Plus | 78 oz | 5-needle MultiStream | Every 3 months | Clean all 5 needle holes |
| K-Slim | 46 oz | Single entry needle | Every 4 to 6 months | Compact chassis, careful access |
| K-Mini | 12 oz per fill | Single entry needle | Every 6 months | Low scale risk, easy reservoir |
| K-Duo / K-Duo Plus | 60 oz | Single + carafe path | Every 3 months | Two separate brew paths |
What You Need Before You Start
Cleaning Supplies
For weekly cleaning you need dish soap, a soft cloth or sponge, a bottle brush for the reservoir, and a paper clip or Keurig needle cleaning tool for the needles. For descaling you need either white distilled vinegar or Keurig’s branded descaling solution (available in single-use packets sized for one descaling cycle).
Keurig recommends their own descaling solution over vinegar, primarily because it’s odorless and doesn’t require as many rinse cycles to clear the taste from the water lines. White vinegar works equally well for breaking down mineral scale but requires 3 to 4 additional rinse cycles to eliminate the vinegar smell from subsequent brews.
Do not use bleach, abrasive scrubbers, or harsh chemical cleaners on any Keurig component. The internal water lines and reservoir are food-contact surfaces, and chemical residue in those areas will contaminate every cup until the machine is thoroughly flushed.
Keurig Needle Cleaning Tool
The Keurig needle cleaning tool (sold separately and included with some newer models) is a small orange plastic tool with a silicone tip designed to fit into the entry needle and clean the channel without bending or damaging the needle tip.
A straightened paper clip works as a substitute for the needle cleaning tool in a pinch. Insert it carefully into the needle hole and move it gently in a circular motion to dislodge dried grounds. Do not apply lateral pressure that could bend the needle, which would require a replacement pod holder to fix.
Step-by-Step Weekly Cleaning Guide
Step 1: Remove and Wash the Drip Tray
Lift the drip tray and drip tray cover off the base of the machine. Both pieces slide off without tools on all standard Keurig models. Wash both components with warm soapy water, rinse thoroughly, and allow to air dry before replacing.
Check the drip tray for coffee staining or mold in the corners. A soft bottle brush reaches the corners of the tray more effectively than a flat sponge. Dry the tray completely before replacing it since a wet drip tray adds moisture under the machine that encourages mold growth on the bottom of the chassis.
Step 2: Clean the Water Reservoir
Remove the water reservoir by lifting it straight up from the rear of the machine. Empty any remaining water fully. Wash the interior with warm soapy water and a bottle brush, paying close attention to the bottom and the outlet valve area where scale and organic residue accumulate.
Rinse the reservoir thoroughly until no soap residue remains. A single drop of dish soap residue in the reservoir will produce a soapy taste in multiple brew cycles before it fully clears. Allow the reservoir to air dry upside down on a clean dish rack before refilling.
Replace the water filter inside the reservoir every 2 months or every 60 tank refills, whichever comes first. The filter is a small charcoal cartridge that clips into a holder on the reservoir wall and reduces chlorine taste and scale-causing mineral content in every cup.
Step 3: Clean the Pod Holder and Needle Assembly
Press the button or lift the tab on the pod holder to release it from the brew head. On most Keurig models the entire pod holder assembly lifts out as one piece. Separate the funnel from the pod holder by squeezing the sides gently.
Wash both pieces under warm running water. Use a bottle brush or toothpick to clear any grounds lodged in the pod holder exit hole. This hole is where brewed coffee flows from the K-Cup into the cup below, and it clogs frequently with fine grounds from espresso-style K-Cups.
Insert the Keurig needle cleaning tool or a paper clip carefully into the entry needle hole at the top of the brew head. Move it gently in small circles to dislodge any dried coffee grounds inside the needle channel. Do this with the machine powered off and the reservoir removed.
Step 4: Wipe Down the Exterior and Brew Head
Wipe the exterior of the machine with a damp soft cloth. Pay attention to the area around the pod holder, where coffee splatter accumulates over time and can drip down into the drip tray channel or onto the water reservoir seat.
Use a dry cloth or cotton swab to clean around the brew head opening where the entry needle sits. Coffee residue in this area can drip down onto the top of K-Cups during brewing and contaminate the puncture site. Reassemble all components before proceeding to the descaling cycle if one is due.
Step-by-Step Descaling Guide
Step 1: Prepare the Machine for Descaling
Empty the water reservoir completely and remove the water filter cartridge from its holder inside the reservoir. Running descaling solution through the water filter damages the charcoal and renders it ineffective. Store the filter in a small cup of water while descaling.
Ensure the drip tray is empty and in place. Place a large mug (at least 16 oz capacity) on the drip tray to catch the descaling solution as it brews through. Do not use a K-Cup during descaling cycles.
Step 2: Add Descaling Solution
Pour the full bottle of Keurig Descaling Solution into the empty reservoir, then fill the empty descaling solution bottle with water and add that to the reservoir as well. This brings the total volume to approximately 48 oz, which is the correct concentration for a full descaling cycle.
If using white distilled vinegar, fill the reservoir to the 48 oz line with undiluted vinegar. Some users prefer a 50/50 vinegar-to-water mix, but full-strength vinegar works faster and more effectively on heavy scale deposits, particularly in machines that haven’t been descaled in over 6 months.
Step 3: Run the Descaling Brew Cycles
Power on the machine and initiate descaling mode. On the K-Elite and K-Supreme, hold the 8 oz and 12 oz buttons simultaneously for 3 seconds to enter descaling mode. On the K-Classic, simply begin running brew cycles manually by selecting the largest cup size with no K-Cup inserted.
Run brew cycles continuously, emptying the mug into the sink after each cycle, until the reservoir is empty and the machine displays “More Water Please” or a similar low-water indicator. This typically takes 8 to 12 full brew cycles depending on model and cup size selected.
Step 4: Run Fresh Water Rinse Cycles
After the descaling solution has been fully run through, fill the reservoir to the maximum line with fresh filtered water. Run a full reservoir of fresh water through brew cycles at the largest cup size with no K-Cup to flush all residual descaling solution from the internal water lines.
For white vinegar descaling, repeat the fresh water rinse cycle a second time. Vinegar residue produces a strong taste in subsequent brews that most people find unacceptable, and a single rinse cycle is rarely sufficient to clear it completely. Two full reservoir rinse cycles after vinegar descaling eliminates the residual taste reliably.
Replace the water filter cartridge in the reservoir after the rinse cycles are complete. A new filter after descaling is ideal since the old filter may have absorbed mineral particles dislodged during the descaling process.
Common Mistakes and How to Fix Them
Running Descaling Solution Through the Water Filter
Leaving the charcoal water filter in the reservoir during descaling is one of the most common Keurig cleaning mistakes. Descaling solution saturates the charcoal filter and releases it back into the water lines during subsequent brews, producing an unpleasant chemical taste that persists for weeks.
Always remove the water filter before descaling and install a fresh filter after the rinse cycles are complete. The old filter should be discarded after a descaling cycle even if it hasn’t reached its normal replacement interval.
Not Emptying the Drip Tray During Descaling
The drip tray fills much faster during descaling cycles than during normal brewing because you’re running large volumes of liquid through without a K-Cup absorbing any of it. Overflow from a full drip tray during descaling spills onto the counter and into the machine’s base.
Check and empty the drip tray every 3 to 4 brew cycles during descaling. Keep a towel nearby and check the tray level before each cycle rather than waiting for an overflow signal.
Ignoring the Descale Light for Months
The descale indicator light on models like the K-Elite and K-Supreme Plus activates based on brew count rather than actual scale measurement. Ignoring it for months allows scale to harden and bond more firmly to the heating element surfaces, making it significantly harder to remove with a single descaling cycle.
Heavily scaled machines sometimes require two consecutive descaling cycles to fully clear the buildup. Running a second cycle immediately after the first, before refilling with fresh water, dissolves the remaining scale that the first cycle loosened but didn’t fully remove.
Pro Tips for a Cleaner Keurig
Use Filtered Water to Slow Scale Buildup
The single most effective way to reduce descaling frequency is to use filtered water in the reservoir instead of unfiltered tap water. Tap water hardness varies significantly by region, and in hard water areas the mineral content is high enough to require descaling every 6 to 8 weeks rather than every 3 to 6 months.
A pitcher filter like a Brita or PUR reduces dissolved calcium and magnesium content before it enters the machine. Pairing pitcher-filtered water with the Keurig’s internal charcoal filter provides two-stage mineral reduction that substantially extends the interval between descaling cycles.
Never Leave Water Sitting in the Reservoir Overnight
Water left in the reservoir for 24 hours or more begins developing conditions favorable to bacterial and mold growth, particularly in a warm kitchen environment. Empty the reservoir each evening if you won’t be brewing the following morning.
Refilling with fresh water before each use takes less than 30 seconds and eliminates the primary cause of off-tasting coffee and visible reservoir contamination in machines that receive regular external cleaning but still taste stale.
Run a Water-Only Cycle Before the First Morning Brew
Running a single water-only cycle (no K-Cup, largest cup size) as the first cycle of the day flushes any standing water from the internal boiler and water lines and brings the heating element up to full operating temperature. This primes the system for optimal extraction temperature on the first real brew.
This practice also reduces the musty or flat taste that some users notice in the first cup of the morning, which comes from water that sat in the internal tubing overnight at ambient temperature.
Frequently Asked Questions
How often should I clean my Keurig?
You should perform basic cleaning of removable parts, including the drip tray, water reservoir, and pod holder, every week for daily users or every two weeks for light users. The needle assembly should be cleaned monthly or whenever you notice grounds in the cup or reduced water flow.
Descaling should happen every 3 months in hard water areas, every 3 to 6 months with soft or filtered water, or whenever the descale light activates. Machines used in office environments with multiple daily users need more frequent cleaning across all categories.
Regular light cleaning prevents the buildup that requires aggressive corrective cleaning later.
Can I use white vinegar instead of Keurig descaling solution?
Yes, white distilled vinegar effectively removes mineral scale from Keurig internal components. It’s significantly less expensive than Keurig’s branded descaling solution and works through the same acidic dissolution mechanism.
The main downside is that vinegar has a strong odor that requires 2 to 3 additional fresh water rinse cycles to fully clear from the water lines and internal tubing.
Keurig’s descaling solution is odorless and typically requires only one rinse cycle, making it more convenient. Either option removes scale effectively when used at the correct concentration and with a thorough rinse cycle afterward.
Why is my Keurig still slow after descaling?
If your Keurig brews slowly after a complete descaling cycle, there are three likely causes. First, the needle may be partially clogged with dried coffee grounds that descaling solution doesn’t dissolve since it targets mineral scale rather than organic material.
Clean the entry and exit needles with the Keurig needle cleaning tool or a paper clip. Second, the descaling cycle may not have fully cleared heavy scale buildup, in which case a second consecutive descaling cycle is needed.
Third, the water pump may be partially failing, which produces consistently slow flow regardless of scale level and typically requires professional service or replacement.
How do I clean the Keurig needles?
To clean Keurig needles, first power off the machine and remove the water reservoir. For the exit needle at the bottom of the pod holder, remove the pod holder assembly from the machine by lifting and pressing the release tab, then use a straightened paper clip or Keurig needle cleaning tool to gently clear the needle hole with small circular motions.
For the entry needle in the brew head, insert the cleaning tool carefully into the needle opening and move gently in circles. Never apply sideways pressure that could bend or misalign the needle. Rinse the pod holder under running water after cleaning and run two water-only cycles before brewing.
How do I get rid of the vinegar taste after descaling?
Run two complete reservoirs of fresh filtered water through brew cycles at the largest cup size with no K-Cup to flush vinegar residue from the internal water lines. Fill the reservoir to maximum, run it completely dry through back-to-back cycles, then refill and repeat the entire process. After the second rinse reservoir, brew a water-only test cycle and smell the output before installing a K-Cup.
If the vinegar smell is still present, run a third rinse reservoir. Installing a fresh charcoal water filter cartridge after the rinse cycles also helps absorb any remaining vinegar compounds from the water before they reach the cup.
Can I put Keurig parts in the dishwasher?
The water reservoir, drip tray, drip tray cover, and mug stand on most Keurig models are top-rack dishwasher safe according to Keurig’s official cleaning guidelines. The pod holder and funnel are also generally dishwasher safe on the top rack.
Never put the main machine body, lid, or any component containing electrical parts in the dishwasher. High dishwasher heat can warp plastic components over time, so hand washing with warm soapy water is preferable for longevity, particularly for the water reservoir, which can develop micro-warps in the outlet valve area from repeated high-heat dishwasher cycles.
Why does my Keurig coffee taste bad even after cleaning?
Bad-tasting coffee after cleaning usually comes from one of three sources: residual descaling solution or vinegar from insufficient rinse cycles, a water filter that needs replacement, or a K-Cup storage or compatibility issue.
Run an additional fresh water rinse cycle first and taste the output. If that doesn’t resolve it, replace the charcoal water filter cartridge in the reservoir since an expired filter can release absorbed minerals back into the water. Also check that the K-Cups you’re using haven’t passed their best-by date and are stored in a cool, dry location away from strong odors, since K-Cups can absorb ambient smells through the foil seal over time.
How do I clean a Keurig that has mold in it?
For visible mold in the water reservoir, wash the tank thoroughly with warm water and one teaspoon of white vinegar per cup of water, scrub all interior surfaces with a bottle brush, rinse with clean water three times, and air dry completely before refilling.
For suspected mold in the internal water lines, run a full descaling cycle with undiluted white vinegar, which has both descaling and antimicrobial properties. Follow with three full reservoir rinse cycles of fresh water. Prevent future mold growth by emptying the reservoir when the machine won’t be used for 24 hours or more and allowing the reservoir to air dry periodically rather than always keeping it filled.
How long does a Keurig last with proper cleaning?
A well-maintained Keurig with regular descaling and weekly part cleaning typically lasts 5 to 8 years under normal household use. Models like the K-Elite and K-Supreme Plus with stainless steel accents and higher-quality internal components tend toward the upper end of that range.
Machines that are never descaled often fail within 2 to 3 years from scale-related heating element burnout or pump failure. The water pump and heating element are the two components most affected by neglect. Neither is economically practical to replace in home models, making preventive cleaning the only realistic strategy for maximizing machine lifespan.
Conclusion
Knowing how to clean a Keurig coffee maker properly is the difference between a machine that lasts 2 years and one that lasts 7. The cleaning routine isn’t complicated, but it needs to be consistent: weekly washing of removable parts, monthly needle cleaning, and descaling every 3 to 6 months based on your water hardness and usage frequency.
The descaling step is where most Keurig owners fall short. Scale buildup on the heating element is invisible until it’s severe enough to affect brew speed or trigger the descale light, by which point two to three years of mineral accumulation may require multiple cycles to clear. Staying ahead of it with proactive 3-month descaling cycles costs 20 minutes and prevents the performance decline that makes people replace machines that were entirely fixable.
For anyone learning how to clean a Keurig coffee maker for the first time, start with the needle cleaning and a full descaling cycle before anything else. Those two steps resolve the vast majority of performance complaints in machines that have been in use for more than a year without maintenance, and the improvement in brew speed, temperature, and cup flavor is immediate and measurable.